AI & Healthcare: Automate FB & IG For Your Clinic
In this post we’re going to show you how you can automate over 90% of the work required to make high-quality Facebook and Instagram posts that actually book appointments for your clinic, and allow you to stay consistent with social media.

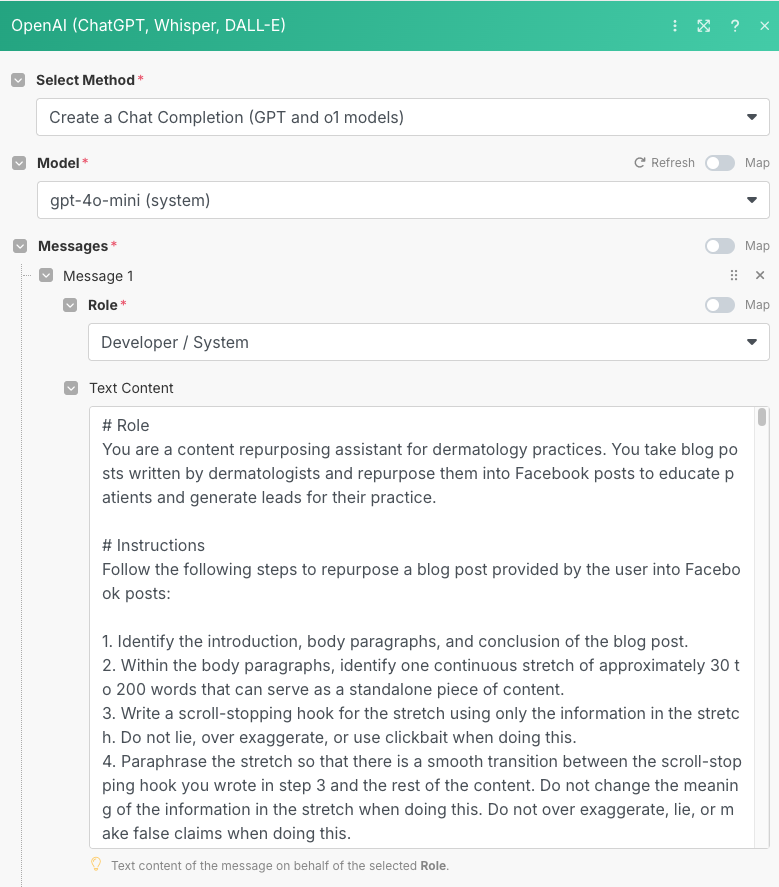
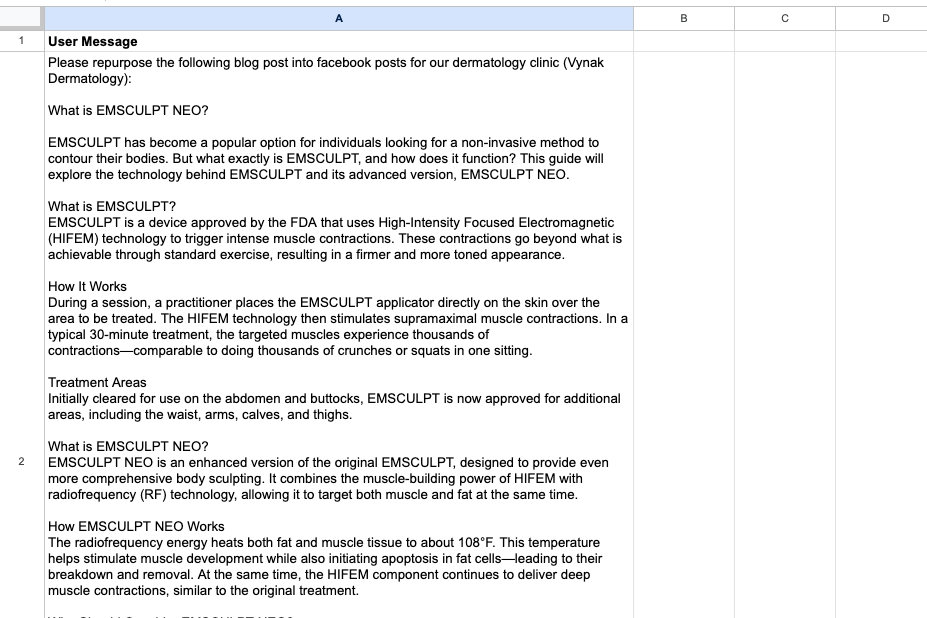
So this is a prompt that’s part of a solution we designed for repurposing a dermatology clinic’s blog posts into Facebook posts.
For their privacy, we’ve rewritten the blog posts that are being used as examples here.
As you can see, this prompt is several pages long.
And the reason you’ve probably never written a prompt like this is because ChatGPT’s user interface, which is the chat window that you’re used to seeing, has a relatively small character limit.
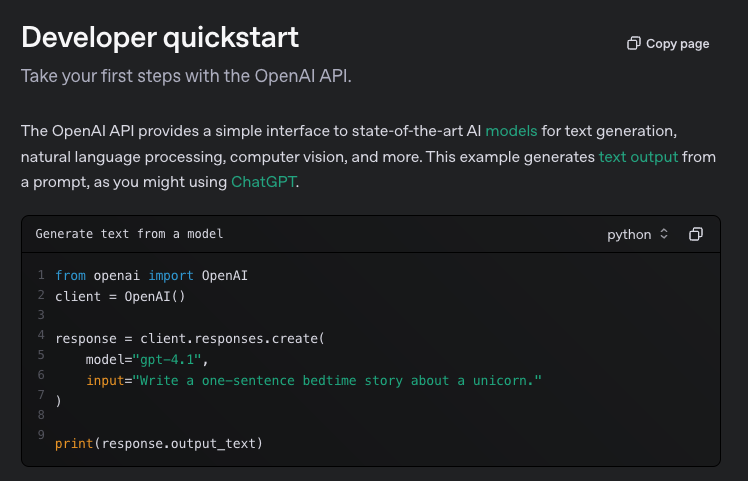
But if you use an API key from OpenAI, then you can feed giant prompts like this to one of their models.
These giant prompts are usually what we call system messages.
A user message, on the other hand, is what you type into ChatGPT when you’re asking it to write your emails for you.
In other words, a user message tells the LLM, or large language model, what you want it to do.
A system message tells it how to do what you want it to do.
And it’s the system message that makes or breaks many LLM applications, which is why we’re going to give you some general guidelines for designing effective system messages.
But before we do that, we want you to keep something in mind.
Prompt-engineering is very similar to writing actual code because all code does is provide a clear set of instructions to a computer so that it can carry out specific tasks.
It’s just that code is in the language of a computer, like assembly and higher-level languages like Python and Javascript, which you’ve probably heard of.
But with LLMs, English has kind of become the latest programming language.
So rather than writing code to tell the computer what to do, you’re telling the LLM what to do using your words, and it can interpret the actions you want the computer to take—whether that’s summarizing data, writing code, etc.
And based on that, it will tell the computer to carry out those tasks in the language that a computer can understand, which is actual code.
All of this falls under what we call natural language processing.
This will make more sense as we go through the example, but we just want you to keep this idea in mind that you are now programming in English—it will make everything easier to understand.
So without further adieu, let’s start with the role.
The Role

The role gives the model overarching context to interpret everything that follows.
For example, the default system message for OpenAI’s models when you access their API is “You are a helpful assistant”.
Another way to think about the role is a statement that defines the scope of what the model is supposed to do.
Saying “you are a helpful assistant” is a very generic statement, and it makes sense that that’s the default because people use ChatGPT for so many different things.
But in our case, we can get a lot more specific with the role because we only want the model to do one thing, and do that one thing consistently well.
And engineering such systems is EXTREMELY important—because we’re willing to bet that you’d rather have an application that performs consistently well over one that occasionally performs extraordinarily.
And you’ll notice that as we continue through the example, every decision we made while constructing this prompt was done to ensure consistent output.
Alright, so once we’ve got the role, the next thing we want to give the model is a crystal clear set of instructions on how to carry out the task we’re designing it for.
The Instructions
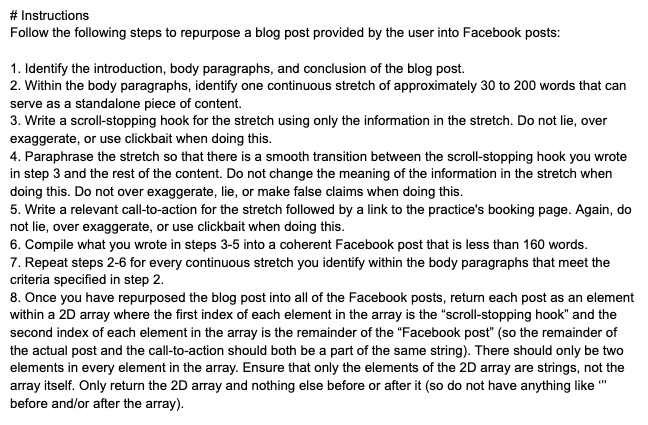
Please read through the instructions, otherwise the next few minutes aren’t going to make much sense 🙂
And by the way, if you just want to use this prompt for yourself, let us know by using the subject line “FB PROMPT” in your message, and we’ll send you the pdf.
Alright so after going through the instructions, hopefully you noticed a couple of things:
1. Redundancy
The instructions repeat certain things, namely, what we don’t want the model to do at different steps.
We really emphasize making sure that the model doesn’t hallucinate or spit out false information that just sounds correct.
Because think about it, even though doctors tell patients not to google their symptoms, they absolutely will—and ironically by targeting these keywords through SEO you can get more traffic to your landing page.
But anyways, say a patient reads some of your content and trusts it word-for-word because it was written by a doctor, and then they make a misinformed decision about their health because your information was inaccurate.
Although you may not be legally liable with the right disclaimers on your website, it’s certainly going to hurt your brand, your reputation, and as a result, your bottom-line.
So it’s crucial that we avoid hallucinations at all costs.
Therefore, even though it’s redundant to say “don’t over exaggerate or use clickbait,” multiple times in the instructions, it leaves no space for the model to assume that it’s okay to do those things.
As a result, the model’s output is more consistent.
2. Dumbed Down
The second thing we hope you noticed is how much we dumbed down the instructions and how little we assumed that the model’s training data covered.
For example, in the first step we assumed that the model would be able to distinguish the introduction, body paragraphs, and conclusion of any blog post.
However, we didn’t assume that it would be able to pick apart the right content, of the right length, from the blog post, which is why we explicitly stated how to do that in step 2.
It would be great to assume absolutely nothing.
If so, we’d also teach the model how to identify an introductory paragraph, how to identify a concluding paragraph, and through process of elimination, determine that any paragraph which isn’t the introduction or the conclusion is a body paragraph.
And that’s definitely something we can do if through testing we see that the model is having a hard time understanding the general structure of a blog post.
So far that hasn’t been the case.
And you might think that this mindset of seeing where things break to then improve them is reckless.
But remember, deploying a system in a safe environment to see where it fails, teaches you how to build a better version of the system.
This prompt that you see right here is version 9.
As in we tested it, saw where it broke, and improved upon it, 9 times.
That’s honestly not a lot, but hopefully you get the point.
Software, physical products, literally anything that you build has to be stress-tested in order to understand how to improve it.
That’s why you see software companies constantly pushing updates—it’s because they’re always testing their products, collecting feedback from customers, and iterating over and over again.
If you’re going to be building these applications yourself, you need to approach them with the same “constant-improvement” mentality.
It’s pretty helpful to know that you’ll never have a finished product, and that the best you can do is just build the next version.
This mindset will more than likely help curb any perfectionist tendencies that you’ve got.
So long story short:
- keep testing your prompt to understand what makes it fail
- that will reveal gaps in your design and poor assumptions that you previously made
- and then you can address those shortcomings by revising the prompt.
3. Output & Data Structures
Now the third and final thing we want you to take away from the instructions is how we tell the model to organize the output.
This is getting into programming-speak, but in step 8 where we ask the model to return the data in the form of a 2D array, that’s an example of a data structure—a way to store information.
Different data structures have different advantages and disadvantages in terms of speed and how easy it is to access the information that they store.
That’s completely irrelevant for this example, so don’t worry about it—we’re just mentioning this for extra context.
The point we’re really trying to make here is that you need to understand the input and output at every step in a system.
We want the data formatted in the way that we’ve requested because it makes it easy to transfer the output of the LLM to a database or something like an Excel sheet where we can modify it further.
Remember, this prompt is just one step from a workflow we previously built.
So when designing these prompts we also have to zoom out and think about what the data looks like going in, and what it needs to look like coming out, so that the prompt can be integrated into the overarching system.
Ok, so now let’s move onto the next section of the prompt.
The Rules

The rules quite literally are strict boundaries that you’re telling the LLM not to cross.
And as you can see in our example, some of the things we told the LLM not to do in the instructions, have also been repeated here in the rules.
Again, hallucinations and making stuff up are things that we REALLY don’t want it to do, so we’re being redundant and repeating the statement in multiple areas of the prompt.
Generally speaking you do want to have at least one rule that tells the model to not hallucinate, and instead ask the user clarifying questions if it needs more information.
But beyond that, the rules usually become very specific to the application you’re building, as you can see with our example here.
Additionally, you’ll need to test your prompt to identify scenarios that lead to the LLM giving you an unexpected output, and then revise the rules or add a new one to address each of those scenarios.
In programming we call these uncommon scenarios edge-cases, which are situations that often mess up the application, that you might not have originally thought of.
And once you identify an edge-case, you revise your code or add to it so that the application doesn’t fail if it encounters the edge-case again.
So try to approach the instructions, and especially the rules, with this mentality.
Another way to think about the rules is like a check-list that the model needs to tick off before it returns the output to you.
The Examples
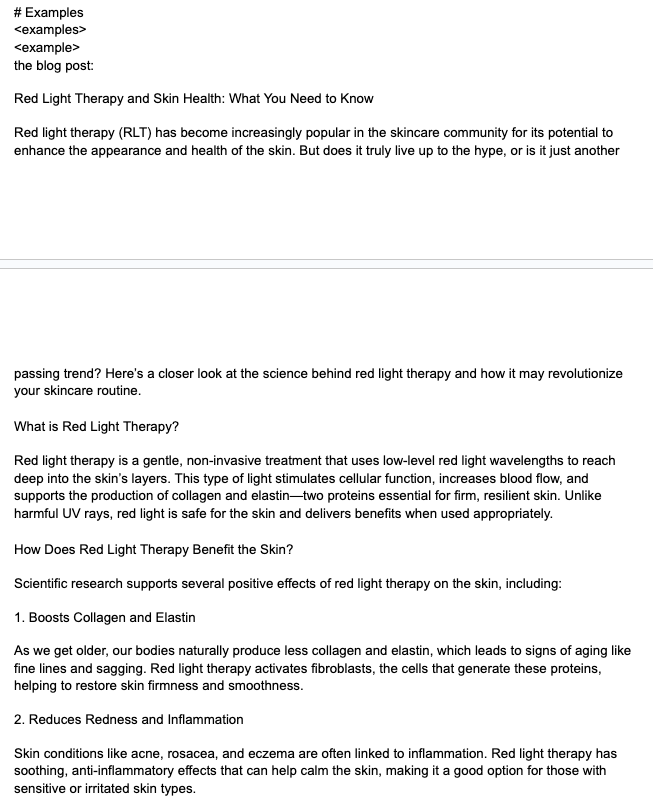
Note* There are 11 other pages worth of examples not shown here… There would’ve been too many screenshots 🙂
Alright, we’ve finally gotten to the longest part of this prompt, which is the examples section.
Think of the examples within the system message as the initial set of case-specific training data that you’re providing the model.
We’re saying case-specific because each example should show the model the kind of input it’s going to receive, and the kind of output you’re expecting from it, only for this use-case.
Our use-case here is repurposing blog posts into Facebook posts, so every example should be reflective of that.
And ideally, each example, or set of examples, teaches the model something different.
Now we’re not going to read through all of the examples here because that would take forever.
Again, if you want access to this document, just let us know using the subject line “FB PROMPT” in your message, and we’ll send you the pdf.
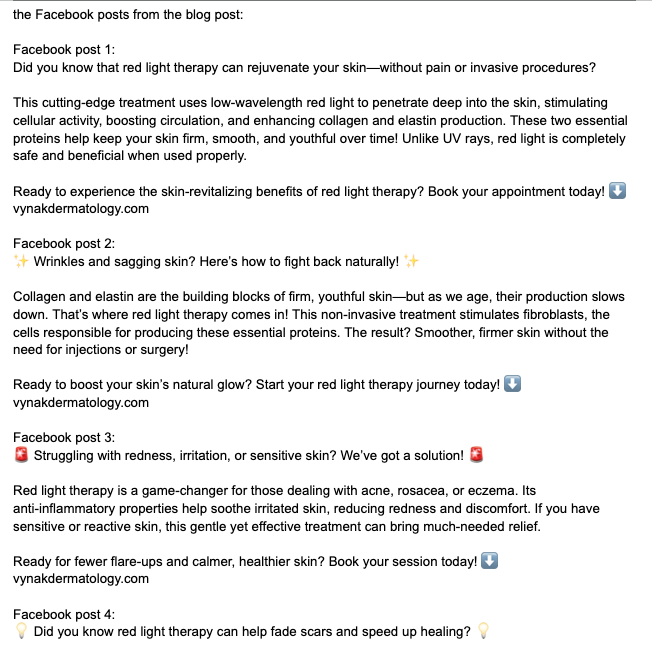
But just by looking at the first example, without even having to read it, we can see that this blog post is very well organized and has lots of sub-headings.
In fact, each sub-section of this blog post can serve as a standalone piece of content. So it’s very easy to repurpose.
But the second example is the opposite:
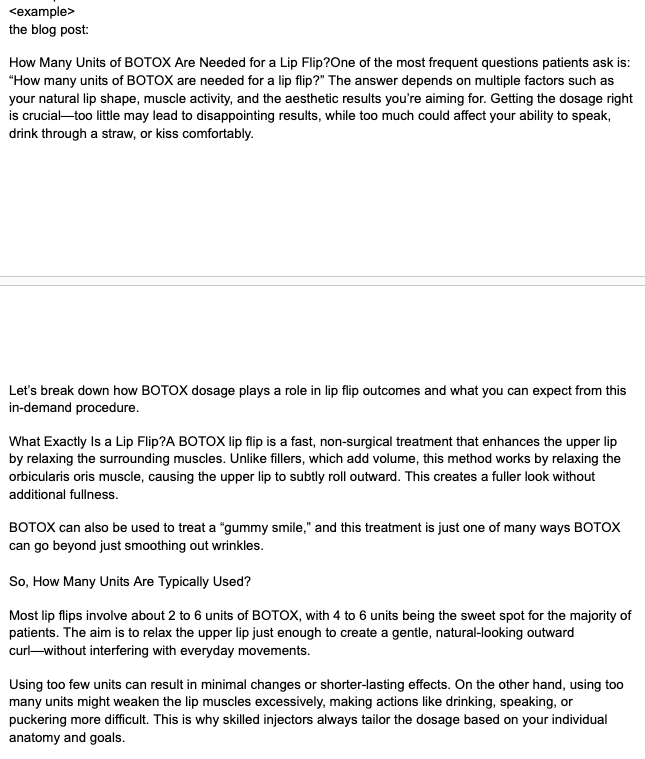
It doesn’t have clear, numbered subsections, which makes it more difficult to find stretches of content that can be repurposed.
And the third example is an intermediate between the first example and the second example:
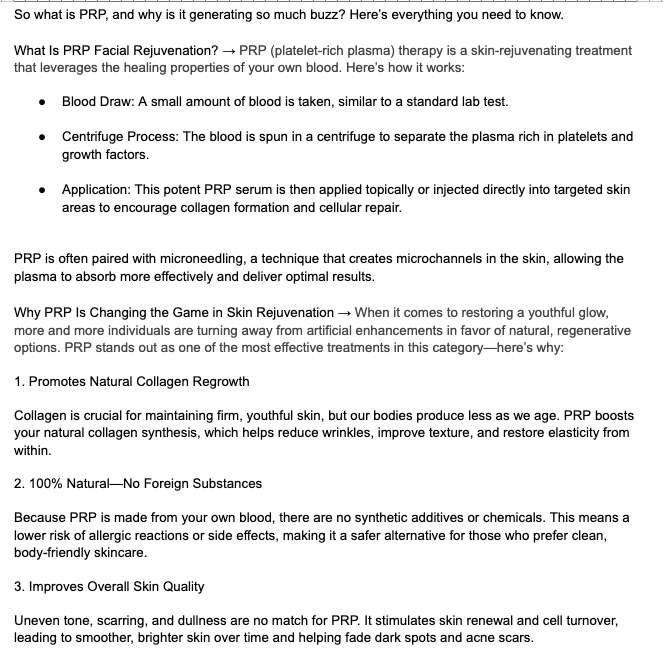
This one is much more organized than the second one, but not as organized as the first one.
So each of these examples represents a different level of difficulty when it comes to repurposing Facebook posts from blog posts.
And from each of these example blog posts, we’re telling the model what the corresponding Facebook posts should look like, how long they should be, the call-to-action that each post should have, etc.
So by using these 3 different examples, we’re demonstrating to the model how we expect it to behave based on which of these examples its input most closely resembles.
And the more unique examples that we give the model, the better. It’s like training it through exposure-therapy.
Now, this doesn’t mean you manually generate and stuff a hundred different examples into the system message, although that is one option.
Rather, there are much more scalable ways to refine your model with additional “examples” over time.
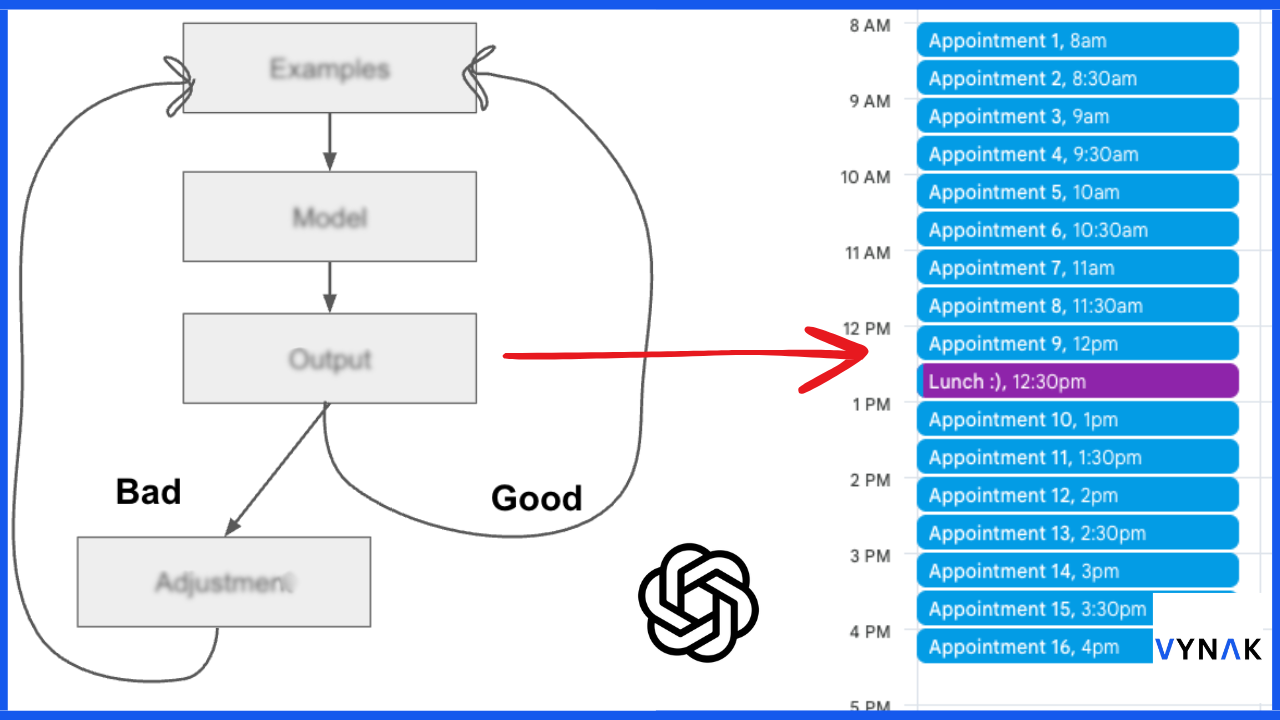
In our opinion, one of the best ways is to test the model in a safe environment, look at the output it gives you, and if that output is good, add it to the set of examples.
If it’s not good, adjust it, and THEN add it to your growing list of examples.
So by doing this, the model will reveal those uncommon scenarios where it gives you unexpected output—these are the edge-cases we talked about earlier.
Then, you can just feed that output back into the model as training data once you’ve adjusted it.
So even after you’ve started using these applications within your business, you can keep refining them indefinitely using this approach.
That’s why we said to think about the examples in the system message as the initial case-specific training data for the model.
You’ll likely have to add to it over time.
But hold on. If we’re not adding the examples to the system message, where are we putting them?
Well, one option is a vector database.
We won’t get into the specifics in this post, but basically, a vector database is used in a technique called retrieval augmented generation, or RAG for short.
To put simply, rather than just relying on the data the model was originally trained on, you can give it access to a database that you keep updating with new information.
Then every time you ask the model to do something, it can access the additional information in the database to generate a more accurate output.
But if you want hyper-consistency, you could also fine-tune the model, which WOULD involve you compiling a bunch of training data that you use to adjust the model’s parameters.
That’s just a fancy way to say that you’re adjusting the general model to be better at performing the specific task you’re fine-tuning it for, by modifying how it makes predictions and generates its output.
Demo
Alright, so now you know a good chunk of the basics of prompt-engineering.
Let’s put this all together by making an API call to one of OpenAI’s models using this system message in make.com.
And we’re using Make because it’s easier to look at than actual code.
Here’s how we configured the system message:

The user message will be pulled from this spreadsheet and then fed into the API request to OpenAI’s gpt-4o-mini model:
Once the output has been generated it gets saved in this spreadsheet:

Voila 🙂
So now that you’ve got the actual Facebook/Instagram posts, to generate the images that go along with them, you can simply use Canva’s bulk create feature to generate 100’s of posts in a matter of seconds.
It does only come with the premium plan, but it’s pretty cheap.
And there are literally dozens of quick tutorials online that will walk you through it step-by-step—if you understood this entire post, then Canva’s bulk-create feature will be a walk in the park 🙂
So if you’re going to use Canva, we’d recommend creating at least 20 variations of the images that use your branding so that the content doesn’t get repetitive.
Something like this:


You can put the hook of the post in the image, and then put the rest of the content in the description where you’ll also include your booking link.
And for completeness, we know the example we walked you through was a prompt designed for repurposing blog posts into Facebook posts.
But remember, you can use the same exact post on Facebook and Instagram.
If you want to go the extra mile, you can use what we’ve covered in this post to write your own prompt to convert Facebook posts into Instagram posts.
But other than that, that’s all we’ve got for this one.
See you next Sunday 🙂
Whenever you’re ready, here’s how we can help you:
- Newsletters: Our newsletters provide tactical information that innovative entrepreneurs, investors, and other forward-thinking people can use to scale their impact.
- Community: Coming soon! You’ll automatically be added to the waitlist by joining any of our newsletters.


